🔧 Project Overview

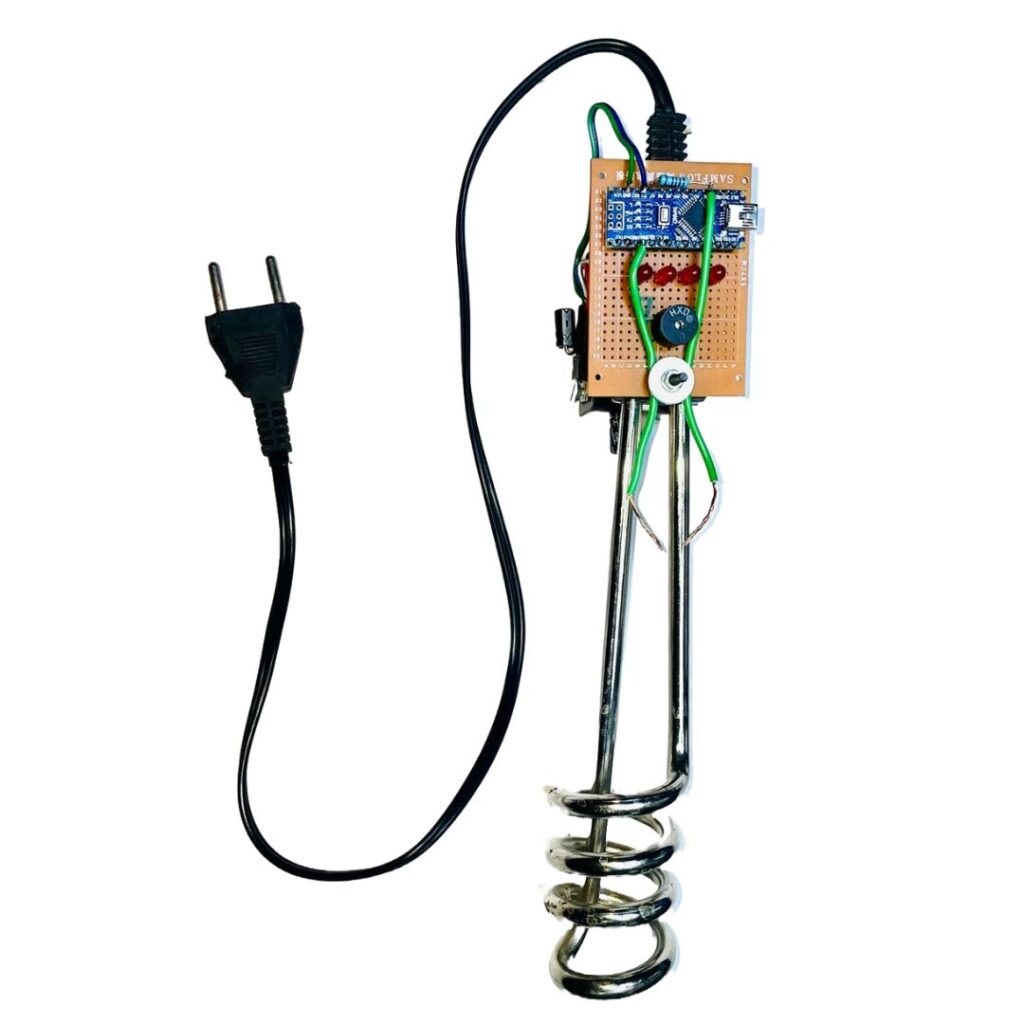
In this blog, I’ll show you how I made a simple yet powerful Immersion Rod Water Safety Alarm using an Arduino Nano, LM7805 voltage regulator, and a buzzer/LED indicator system. This project is designed to alert you when the immersion rod is removed from the water, preventing dry heating or potential hazards.
It’s an ideal project for science exhibitions, home safety, and DIY electronics enthusiasts.
⚠️ DIY Educational Kit Only Not for industrial or AC control use. make or Use at your own risk. The creators/sellers are not responsible for any damage, loss, or injury resulting from the use or misuse of this project.

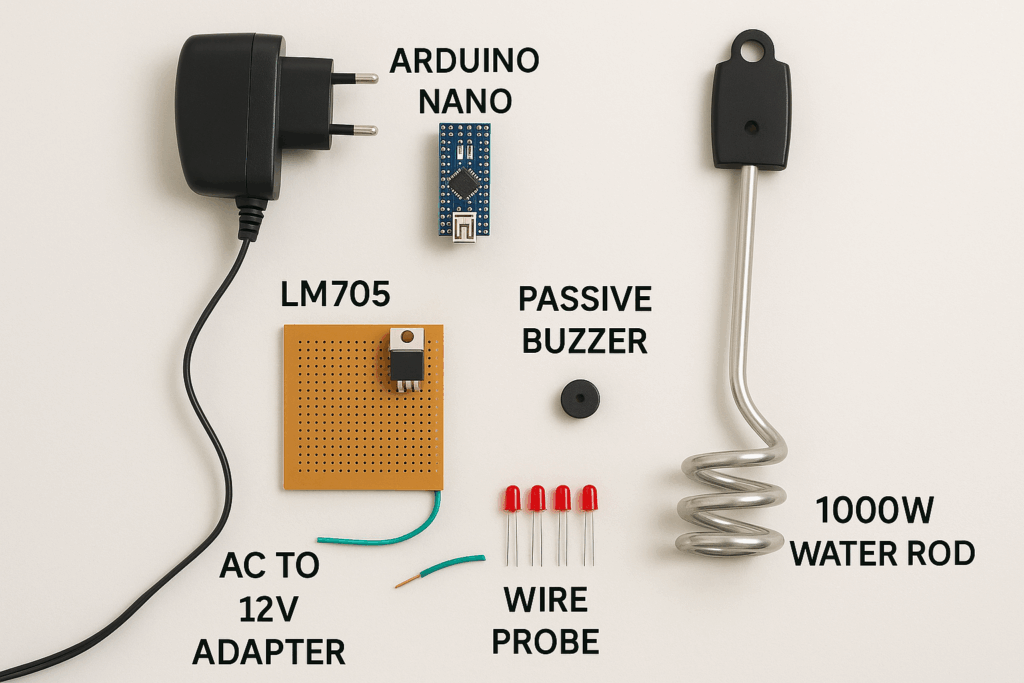
⚙️ Components Used
- 🔌 AC to 12V Adapter (Step-down power supply)
- ⚙️ LM7805 Voltage Regulator (to get 5V regulated output)
- 💡 Arduino Nano (for analog detection logic)
- 🔔 Passive Buzzer (audio alert)
- 💡 LED (visual alert)
- 🧪 Wire Probe (acts as water detection sensor)
- 🔥 1000W Immersion Rod (standard water heater rod)
- 🔩 Custom Soldered PCB (compact final assembly)
- 🧰 Miscellaneous: resistors, wires, terminal blocks, 1000uF capacitor, and a small project box
🛠️ How It Works
The wire probe is inserted into the water near the immersion rod. When both probe wires are in water, they form a weak electrical bridge (water conducts slightly), which is read by the Arduino’s analog pin (A0).
- If the rod is in water, the circuit reads low resistance, and no alarm is triggered.
- If the rod is removed or water dries up, the analog value increases, and the Arduino triggers a buzzer and blinking LED as a warning.
📘 Circuit Wiring Guide – Immersion Rod Water Safety Alarm
🔋 Power Supply:
- Use an AC to 12V adapter or DC 12V power source.
- Connect 12V positive to VIN pin of the LM7805 regulator.
- Connect GND of 12V to the GND pin of LM7805.
LM7805 Output:
- Output pin (middle/right): 5V → Goes to Arduino Nano 5V pin
- GND pin: Connect to Arduino Nano GND
💧 Water Probe (Sensor):
- Use two wires as probes — insert them in water near the immersion rod.
- One wire connects to Arduino GND.
- Second wire connects to A0 pin of Arduino Nano.
- Add a 10K pull-up resistor between A0 and 5V (for better detection).
🔔 Buzzer:
- Use a passive buzzer (two-pin).
- Positive (long leg) → Arduino D3
- Negative → Arduino GND
💡 LED (Fast Blink):
- Use 4x Red LEDs (or single LED in testing phase)
- Each LED has a 220Ω resistor in series (to protect it)
- Connect all 4 LEDs’ positive legs together to Arduino D2
- Connect all negative legs to GND
🧠 Arduino Nano Pin Mapping:
| Pin | Function |
|---|---|
| VIN | Power from LM7805 (5V Regulated) |
| GND | Ground (common to all) |
| A0 | Input from water probe |
| D2 | LED (Blinking Alert) |
| D3 | Buzzer (Sound Alert) |
✅ Arduino Code:
// Immersion Rod Water Safety Alarm
const int waterProbePin = A0;     // Analog input from probe
const int buzzerPin = 3;          // Passive buzzer on pin D3
const int ledPin = 2;             // LED on pin D2

int waterThreshold = 600;         // Adjust based on probe readings

void setup() {
  pinMode(buzzerPin, OUTPUT);
  pinMode(ledPin, OUTPUT);
  pinMode(waterProbePin, INPUT);

  digitalWrite(buzzerPin, LOW);
  digitalWrite(ledPin, LOW);
}

void loop() {
  int probeValue = analogRead(waterProbePin);

  if (probeValue > waterThreshold) {
    // Rod is OUT of water – alert
    digitalWrite(buzzerPin, HIGH);
    digitalWrite(ledPin, HIGH);
    delay(100);
    digitalWrite(ledPin, LOW);
    delay(100);
  } else {
    // Rod is in water – stay silent
    digitalWrite(buzzerPin, LOW);
    digitalWrite(ledPin, LOW);
  }
}
🔋 Power Supply Details
I used an AC to 12V converter to step down mains power safely.
Then I used an LM7805 with 1000µF capacitor (input/output) to get a stable 5V supply for the Arduino Nano and components.
The entire system is low-voltage and safe for demonstration purposes.
💡 Project Highlights
- 🔔 Instant buzzer alert when rod is removed from water
- 💡 Fast blinking LED as visual warning
- ⚡ Runs on 12V input, regulated to 5V for Arduino
- 🧠 Fully soldered on custom PCB for durability
- 📦 Compact and neat enclosure for field use
- 📘 Includes full project report (available with kit purchase)
📦 Where to Buy
You can buy this Immersion Rod Water Safety Project Kit with ready PCB, manual, and wiring from:
🔗 Mechanic37.com
Also available on Amazon & Flipkart!
📽️ Watch the Project in Action (YouTube Short)
🧠 Final Thoughts
This project is a great mix of electronics, safety, and education. It’s easy to build, uses basic components, and helps prevent real-life heating hazards.
Ideal for students, makers, and anyone passionate about smart safety devices!
Tags: #ImmersionRod #WaterLevelAlarm #ArduinoNano #DIYProject #HomeSafety #Mechanic37

Leave a Reply