Control Led With Computer keyboard+ Processing GUI+ Arduino
processing पर Graphical user Interface(gui) create कर के led को control करना computer के keyboard से यह एक छोटा सा project idea है जिसमे आप अपने computer का use करके किसी led को control keyboard का use करके कर सकते है
Material-
Hardware
- Arduino uno with usb cable
- computer
- Led
- jumper wire
software
What is Processing?
Processing एक open source programming Language है जो की Electronic Art के लिए integrated development environment(IDE) develop करती है या हम कह सकते है की processing से हम किसी Arduino board से communicate कर सकते है grafical user interface(GUI ) के through processing को download करें
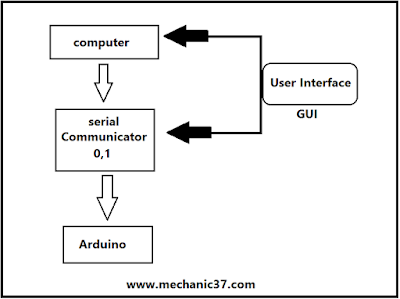
GUI Theory And LED control
Led keyboard up arow key press करने पर on और Down arow key press करने पर off हो जाएगी सबसे पहले circuit बना के arduino को computer से connect करें और Arduino का software launce करके नीचे Arduino के लिए दिया program upload करें और processing का software launce करके processing के लिए नीचे दिया program paste करें यह program Graphical User Interface(GUI) create करेगा जिनसे आप led को control कर पाएंगे

Arduino Electronic Circuit-
- Led long pin को Arduino board की pin 13 से connect करें
- Led short pin को Arduino board की pin Gnd से connect करें
- arduinio को usb cable से computer से connect करें
Programming-
पहले arduino uno के लिए और फिर GUI के लिए processing में code को direct copy paste करें
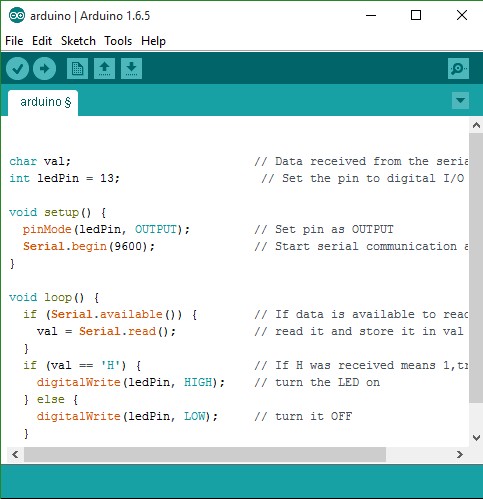
Arduino programming-

इस program को copy कर arduino software में paste करें और program arduino board में upload करें
char val; // Data received from the serial port
int ledPin = 13; // Set the pin to digital pin 13
void setup() {
pinMode(ledPin, OUTPUT); // Set pin as OUTPUT
Serial.begin(9600); // Start serial communication
}
void loop() {
if (Serial.available()) { // If data is available to read,
val = Serial.read(); // read it and store it in val
}
if (val == ‘H’) { // If H was received means 1,true
digitalWrite(ledPin, HIGH); // turn the LED on
} else {
digitalWrite(ledPin, LOW); // turn it OFF
}
delay(100); // Wait
}
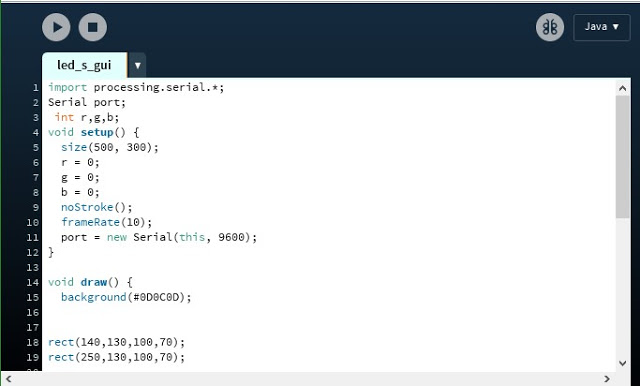
Programming for create Graphical user Interface(GUI)

इस program को copy करके processing में paste करें और top पर बना play का button पर click करे
import processing.serial.*;
Serial port;
int r,g,b;
void setup()
{
size(500, 300);
r = 0;
g = 0;
b = 0;
noStroke();
frameRate(10);
port = new Serial(this, 9600);
}
void draw() {
background(#0D0C0D);
rect(140,130,100,70);
rect(250,130,100,70);
}
void keyPressed()
{
switch (keyCode) {
case UP: {
port.write(‘H’); // Send the signal 1
fill(#FFFCFD);
rect(140,130,100,70);
break;
}
case DOWN:{
port.write(‘L’); // Send the signal 0
fill(#0D0C0D);
rect(250,130,100,70);
}
default:
break;
}
}
ये दोनों program serial port के द्वारा जुड़े हुए है जब आप up arow key press करेंगे तब port ‘H’ receive करेगा जिसका मतलब Arduino के program में HIGH,1 या true है H receive होते ही led on हो जाएगी और processing में भी दो indicator rectangle में white हो जायेंगे और जैसे ही आप Down arow key press करेंगे तो serial port पर L write होगा जिससे condition false हो जाएगी और led off हो जाएगी

Leave a Reply